
Factory answers for moving pixels
Sandustry Guide & Wiki — Plan a Factory That Keeps Running
Build an observable first production loop, measure real throughput, diagnose stalls, and use task-focused guides without relying on invented Early Access ratios.
Start here
Your first reliable Sandustry production loop
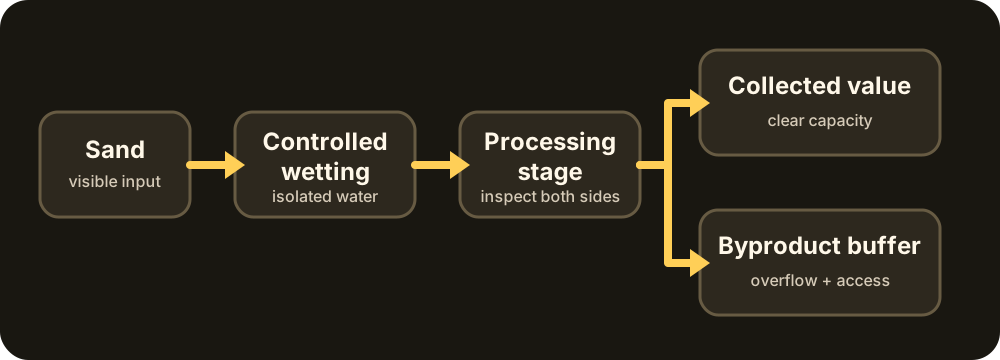
Sandustry is easiest to learn when the first factory behaves like a visible experiment. Begin with a small amount of raw material, a controlled way to introduce water, one processing stage, and separate destinations for every output you can observe. Do not begin by copying a huge screenshot layout. A compact line lets you see where material waits, where it changes, and where it stops. The goal is not a perfect ratio in the first hour; it is a production loop that teaches you what the current Early Access build is doing.
Give the line room above, below, and beside each transition. Falling pixels and liquids make geometry part of the machine. A narrow outlet can be buried, a shared chamber can mix two feeds, and a reservoir can reach a path that looked dry while the factory was empty. Keep the main water reserve isolated from the test chamber. Provide manual access to both sides of the process, then run a small batch from input to collection before increasing supply.
A reliable commissioning check has four parts. First, watch normal flow long enough to distinguish sustained output from a short burst. Second, stop one input and confirm the other cannot flood or bury the module. Third, fill the downstream buffer and confirm overflow remains contained. Fourth, save, reload, and restart at reduced input. If the line recovers, you have a useful module. If it fails, change one boundary at a time so the next test explains what fixed it.
Calculator
Use the Sandustry production planner here
The planner below turns your own measurements into a capacity estimate. Enter the target output per minute, the observed output of one machine or module, expected uptime, and a safety margin. The result rounds up to a whole-machine recommendation. It also shows the effective rate after uptime and the planned target after margin, making the assumptions visible instead of hiding them behind a confident-looking blueprint.
Measure conservatively. Clear the input and output areas, run the same module for a fixed interval, and repeat the observation. If the two runs disagree, use the slower sustained value and investigate the layout before scaling. Burst output is a poor planning rate because material may have accumulated before the timer started. Date each measurement in the blueprint notebook and repeat it after a patch, a geometry change, or a new material route.
This calculator intentionally does not ship a table of official Sandustry recipes or universal machine speeds. Reliable public values may change during Early Access, and a physical layout can reduce effective throughput even when a nominal rate is known. The tool is therefore useful without pretending to reverse-engineer the game: it performs transparent arithmetic on the evidence from your own save and keeps uncertainty visible.
Recommended
5
whole machines
Effective rate
13.50
per machine / min
Base demand
4.44
before safety
Planned target
66.00
with margin
Planning estimate: enter rates observed in your current game build. This calculator does not claim official Sandustry recipe or throughput values.
Troubleshooting
Why Sandustry factories stall
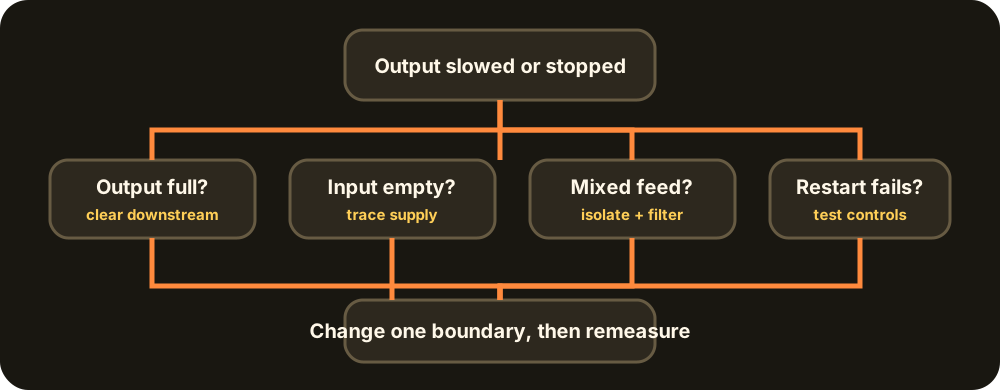
When output slows, adding machines is rarely the best first move. Walk the chain from the final collector toward the input. A full destination can block the stage before it. A blocked stage can make its input buffer rise. That rise can cover an outlet, redirect fluid, or let an unrelated material enter a shared lane. The visible symptom may appear several steps away from the original constraint.
Use buffers as instruments. A consistently full upstream buffer points toward downstream restriction. An empty buffer points toward missing supply. A level that swings between both extremes suggests bursty delivery, insufficient separation, or a process that does not recover cleanly. Mark a normal fill line and an overflow line. Keep the overflow route away from the raw feed, because returning unknown material to the beginning can turn one local fault into a factory-wide contamination problem.
Player discussions repeatedly focus on wet-sand supply, water behavior, filter direction, byproduct accumulation, underwater transport, and lines that work for hours before stopping. Those complaints are valuable demand evidence, but each save can have a different cause. This Wiki converts recurring symptoms into controlled checks: stop input, isolate water, preserve the blocked state, inspect the lowest outlet, clear downstream capacity, and restart slowly. Community shortcuts remain labeled as experiments until supported by stronger evidence.
Layout principles
Build a layout that is easy to diagnose
A diagnosable layout has modules with simple interfaces. Each module should define what enters, the intended height or direction of entry, what leaves, the maximum safe buffer level, and where a player can reach it for maintenance. Leave a visible pocket before and after transformations. Separate fluid storage, wetting, processing, desired output, and byproduct handling instead of collapsing them into one impressive but opaque chamber.
Design a safe off state. The exact controls available can change, but the principle remains stable: stopping power or one material should not release the entire reservoir or send another material backward. Place isolation before expensive or destructive stages. Label it in the blueprint notebook. During recovery, stop feed first, protect the water boundary, create downstream capacity, clear the obstruction, then restart at reduced input while watching the previous failure point.
Scale the proven bottleneck only. If a processing input accumulates while output capacity remains open, add parallel processing. If processing waits empty, improve supply instead. After every change, remeasure the whole chain because moving one bottleneck simply reveals the next. A strong Sandustry factory is not the densest arrangement; it is the arrangement whose state can be read quickly and whose failures stay contained.
Solve one factory problem
Sandustry guide directory
05 guides
Getting Started
15 guides
Materials & Processing
10 guides
Machines & Logistics
09 guides
Automation
11 guides
Troubleshooting
14 guides
Exploration & Systems
Information architecture
Choose the right Sandustry guide
Use the guide directory by problem rather than reading every page in order. New players can start with the first-hour route and falling-sand physics. Material pages explain how to sample, label, separate, and verify feeds without relying on color alone. Machine and logistics pages own specific transport or processing questions. Automation pages focus on buffers, interfaces, overflow, and recovery. Troubleshooting pages begin from a symptom and order checks from reversible to risky.
Each article states its task boundary near the top, gives a quick answer, exposes its evidence context, and links to the next useful task. A page about Water should not compete with a page about Wet Sand, and a Shaker page should not become a generic beginner guide. Keeping one canonical page per intent makes answers easier to maintain and prevents contradictory advice after a patch.
Evidence and updates
What we verify—and what may change
Official developer, publisher, store, Wiki, patch, and support sources establish the strongest factual boundary. Current observable gameplay can demonstrate a procedure when its build context is identifiable. Established guides can provide useful comparison, while Reddit and Steam community posts identify recurring questions and candidate workarounds. A complaint is never promoted into a universal mechanic simply because it is popular.
Video follows the same rule. An official announcement trailer can show the intended automation and falling-pixel premise. A 2025 demo tutorial can demonstrate how an earlier build introduced those ideas, but it cannot establish a 2026 Early Access recipe, rate, progression step, or bug. Every embedded video uses YouTube's privacy-enhanced player, remains optional, and sits beside original text that solves the task without requiring playback.
The site records checked dates and version context because Sandustry is changing. When sources conflict, current official retail evidence wins. When evidence is weak, the page narrows its claim to a diagnostic procedure or is not published. Corrections can be sent through the Contact page, and the Editorial Policy explains how official facts, observed behavior, and community demand are separated.
Primary references: official Steam page, official Wiki, and our evidence policy.